Quantcast
Channel: senangGuide
Viewing all 123 articles
Browse latest View live

Order Update

$
0
0
This feature is not available for Yearly Package subscriber. This feature is available only for Advance Package subscriber.
This feature is applicable for Payment Form and Shopping Cart.

This feature allows you to give an update to your customers after they have made the payment. This is useful if you need to inform your customers the update of their order e.g. “item delivered with tracking id 123456.”

137x22xspace.png.pagespeed.ic.IoAxAisfVW

How the Order Update works?

When merchants use this function:

1. You can send notification from the Dashboard to your customer.

2. Nevertheless, your customers cannot reply to this notification.

3. Order Update is designed as a 1 way communication only. If you need to communicate more, you need to contact your customers through other mediums such as email or WhatsApp.

4. Your customers will receive the update in their email.

5. The Order Update feature is only available for the PAID transaction only.
137x22xspace.png.pagespeed.ic.IoAxAisfVW

How to use

1. Login to your senangPay Dashboard.

2. You need to add your product first to enable this function or go to your existing product in the list.

3. Go to Menu > Transaction > List.

Screen Shot 2016-02-24 at 2.18.48 PM

3. Select the transaction you wish to update. Please take note that only PAID transaction has this function.

4. Scroll down the transaction section until you see “Order Update.”

Screen Shot 2016-02-24 at 3.03.53 PM

5. Insert your preferred update.

6. Then, click the “Submit” button.

7. Now, your customer will receive the update in their email.

senangpay_mobile10

8. The update record is also in your Dashboard for personal copy.

9. You can send unlimited update to your customers.

Screen Shot 2016-02-24 at 3.21.26 PM137x22xspace.png.pagespeed.ic.IoAxAisfVW


Sandbox / Testing Environment

$
0
0

What is Sandbox?

In computer security, a sandbox is a security mechanism for separating running programs. It is often used to execute untested code, or untrusted programs from unverified third parties, suppliers, untrusted users and untrusted websites. A sandbox typically provides a tightly controlled set of resources for guest programs to run in, such as scratch space on disk and memory. Network access, and the ability to inspect the host system or read from input devices are usually disallowed or heavily restricted.

In the sense of providing a highly controlled environment, sandboxes may be seen as a specific example of virtualization. Sandboxing is frequently used to test unverified programs that may contain a virus or other malicious code, without allowing the software to harm the host device.

Reference: Wikipedia

137x22xspace.png.pagespeed.ic.IoAxAisfVW

Does senangPay has Sandbox?

For the mean time, we don’t have any Sandbox yet due to some security and legal issue. We will inform any update on this matter once it is ready.

Screen Shot 2015-04-09 at 1.17.01 PM

Related Content :

1. Refund on payment testing

Screen Shot 2015-04-09 at 1.17.01 PM
Have more questions? Submit a request by clicking the green help button right side, bottom.

Custom Fields in Payment Form

$
0
0
This feature is not available for Yearly Package subscriber. This feature is available only for Advance Package.
This feature is applicable for Payment Form only.

This feature allows you to add 3 additional fields in the Payment Form. Which means, you can get more input from your customer, or you can offer more selections to your customer.

137x22xspace.png.pagespeed.ic.IoAxAisfVW

Original Payment Form without Custom Field

Below is the screenshot of a Payment Form that is without additional custom field.

form_01

137x22xspace.png.pagespeed.ic.IoAxAisfVW

Payment Form with Custom Field

Below is the screenshot of a Payment Form with an additional custom field. Please refer to the new section “Required Additional Field.”

form_02

137x22xspace.png.pagespeed.ic.IoAxAisfVW

Options for custom field

1. Merchant can add up to 3 additional custom fields.

2. The fields can either be dropdown or text field.

3. For dropdown, we only allow a maximum of 6 options.

137x22xspace.png.pagespeed.ic.IoAxAisfVW

How to set

1. Login to your senangPay Dashboard.

2. You need to add your product first to enable this function or go to your existing product in the list.

3. Go to Menu > Product > List.

Screen Shot 2016-02-22 at 4.31.14 PM

3. Select one of your products. Click on the product name.

Screen Shot 2016-02-22 at 4.32.37 PM

4. Scroll down the page and click “Edit Product.”

Screen Shot 2016-02-22 at 4.37.36 PM

5. Now, on the “Product Additional Field,” insert your preferred field.

form_04

6. Then scroll down and click “Confirm Changes.”

Screen Shot 2016-02-22 at 4.40.24 PM

7. Go back to the product page and and check your Payment Form. You should see the additional field in your Payment Form.

137x22xspace.png.pagespeed.ic.IoAxAisfVW

Additional Field Usage

1. You can either add 1, 2 or maximum of 3 additional fields.

2. If you just want to use as input field, leave the option space blank.

3. If you want to use the additional field as dropdown, insert the option values.

4. The option value is not necessarily to be filled until 6.

5. The value is alphanumeric (A – Z and 0 – 9).

137x22xspace.png.pagespeed.ic.IoAxAisfVW

Viewing the data input on your Dashboard

1. All additional fields will capture the data and display them on your Dashboard.

2. When customer made a payment you will be able to see the value entered or chosen in the transaction detail page.

Screen Shot 2016-02-22 at 6.45.28 PM

137x22xspace.png.pagespeed.ic.IoAxAisfVW

When can you access the Dashboard

$
0
0

When can I access the Dashboard ?

You can login to the Dashboard straight away after the subscription fee is PAID.
137x22xspace.png.pagespeed.ic.IoAxAisfVW

Does this mean I can use senangPay before I submit the documents?

Yes. You will have 7 days to submit your documents after sign up.
137x22xspace.png.pagespeed.ic.IoAxAisfVW

What happens if I already login and use senangPay but I refuse to submit the documents afterwards?

We cannot process your settlement.
137x22xspace.png.pagespeed.ic.IoAxAisfVW
Screen Shot 2015-04-09 at 1.17.01 PM

Related Content :

1. What documents to submit
2. How to submit documents
3. What happened after I submit my documents?
Screen Shot 2015-04-09 at 1.17.01 PM
Have more questions? Submit a request by clicking the green help button right side, bottom

Order Update

$
0
0
This feature is not available for Yearly Package subscriber. This feature is available only for Advance Package subscriber.
This feature is applicable for Payment Form and Shopping Cart.

This feature allows you to give an update to your customers after they have made the payment. This is useful if you need to inform your customers the update of their order e.g. “item delivered with tracking id 123456.”

137x22xspace.png.pagespeed.ic.IoAxAisfVW

How the Order Update works?

When merchants use this function:

1. You can send notification from the Dashboard to your customer.

2. Nevertheless, your customers cannot reply to this notification.

3. Order Update is designed as a 1 way communication only. If you need to communicate more, you need to contact your customers through other mediums such as email or WhatsApp.

4. Your customers will receive the update in their email.

5. The Order Update feature is only available for the PAID transaction only.
137x22xspace.png.pagespeed.ic.IoAxAisfVW

How to use

1. Login to your senangPay Dashboard.

2. You need to add your product first to enable this function or go to your existing product in the list.

3. Go to Menu > Transaction > List.

Screen Shot 2016-02-24 at 2.18.48 PM

3. Select the transaction you wish to update. Please take note that only PAID transaction has this function.

4. Scroll down the transaction section until you see “Order Update.”

Screen Shot 2016-02-24 at 3.03.53 PM

5. Insert your preferred update.

6. Then, click the “Submit” button.

7. Now, your customer will receive the update in their email.

senangpay_mobile10

8. The update record is also in your Dashboard for personal copy.

9. You can send unlimited update to your customers.

Screen Shot 2016-02-24 at 3.21.26 PM137x22xspace.png.pagespeed.ic.IoAxAisfVW

Advanced Delivery Costing

$
0
0

tanya

We received inquiry from merchants on how to solve the problems of different delivery costing for different quantity of item. Thus, we have updated the Form with this Advanced Delivery Costing feature.
space

What is Advanced Delivery Costing?

The Advanced Delivery Costing feature allows merchants to specify exact delivery price based on location and quantity of a product. Let’s say a customer wants to buy 1 item with a delivery cost of RM6.00, thus, when the customer decides to buy 3 items instead, the delivery cost can be specified to RM18.00, and not RM6.00.
space

What are the supported locations in the Advanced Delivery Costing feature?

For the time being, the location can be specifed to:

1. Peninsular Malaysia
2. Sabah
3. Sarawak
4. Singapore
5. Brunei
6. Others
space

What if my delivery is to other countries not listed, like Indonesia ?

You can choose to insert the delivery cost in the “Others” field.
space

Does this mean that I need to have one flat rate for other countries?

Yes. We advise you to have one flat rate that applies to all countries that are not listed.
space

Does the Advanced Delivery Costing support multi-currency?

No. The current currency is still in RM (Ringgit Malaysia). This is because the delivery cost is paid in RM and is still paid from Malaysia.
space

How to set the Advanced Delivery Costing?

Here are the steps on how to set this feature.

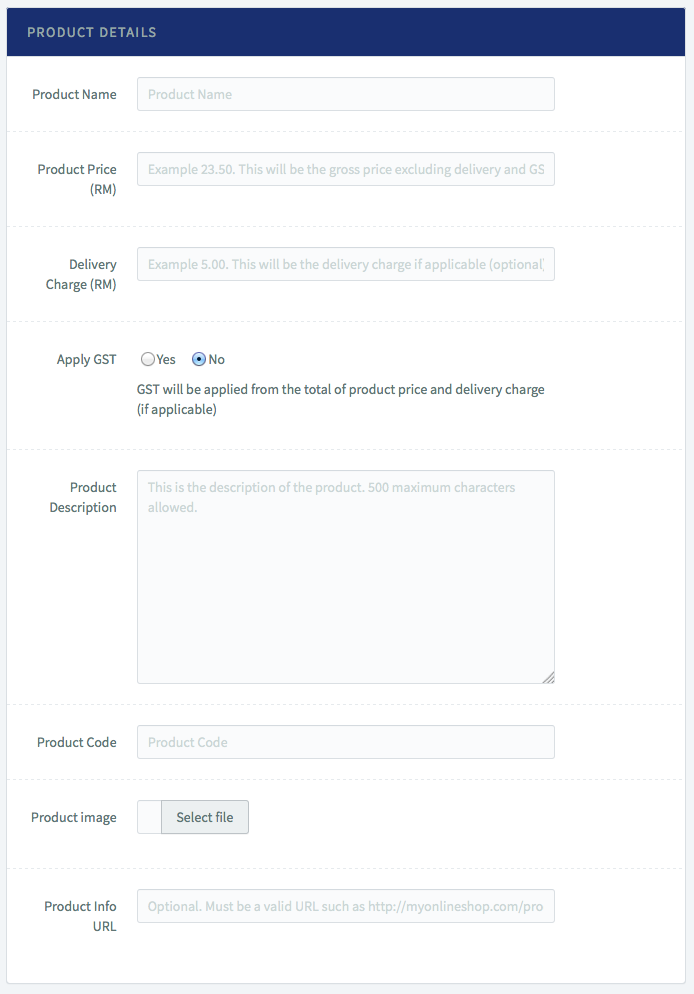
1. Add your product as usual. Read here for details on how to add product.
2. Next, when your product has been added, select the added product again.
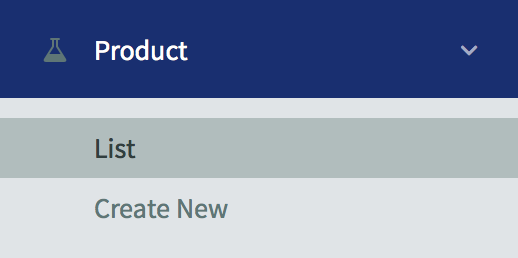
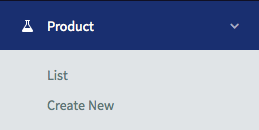
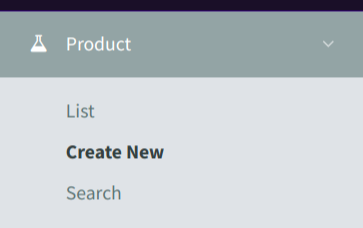
3. Click Product > List.

menu_04

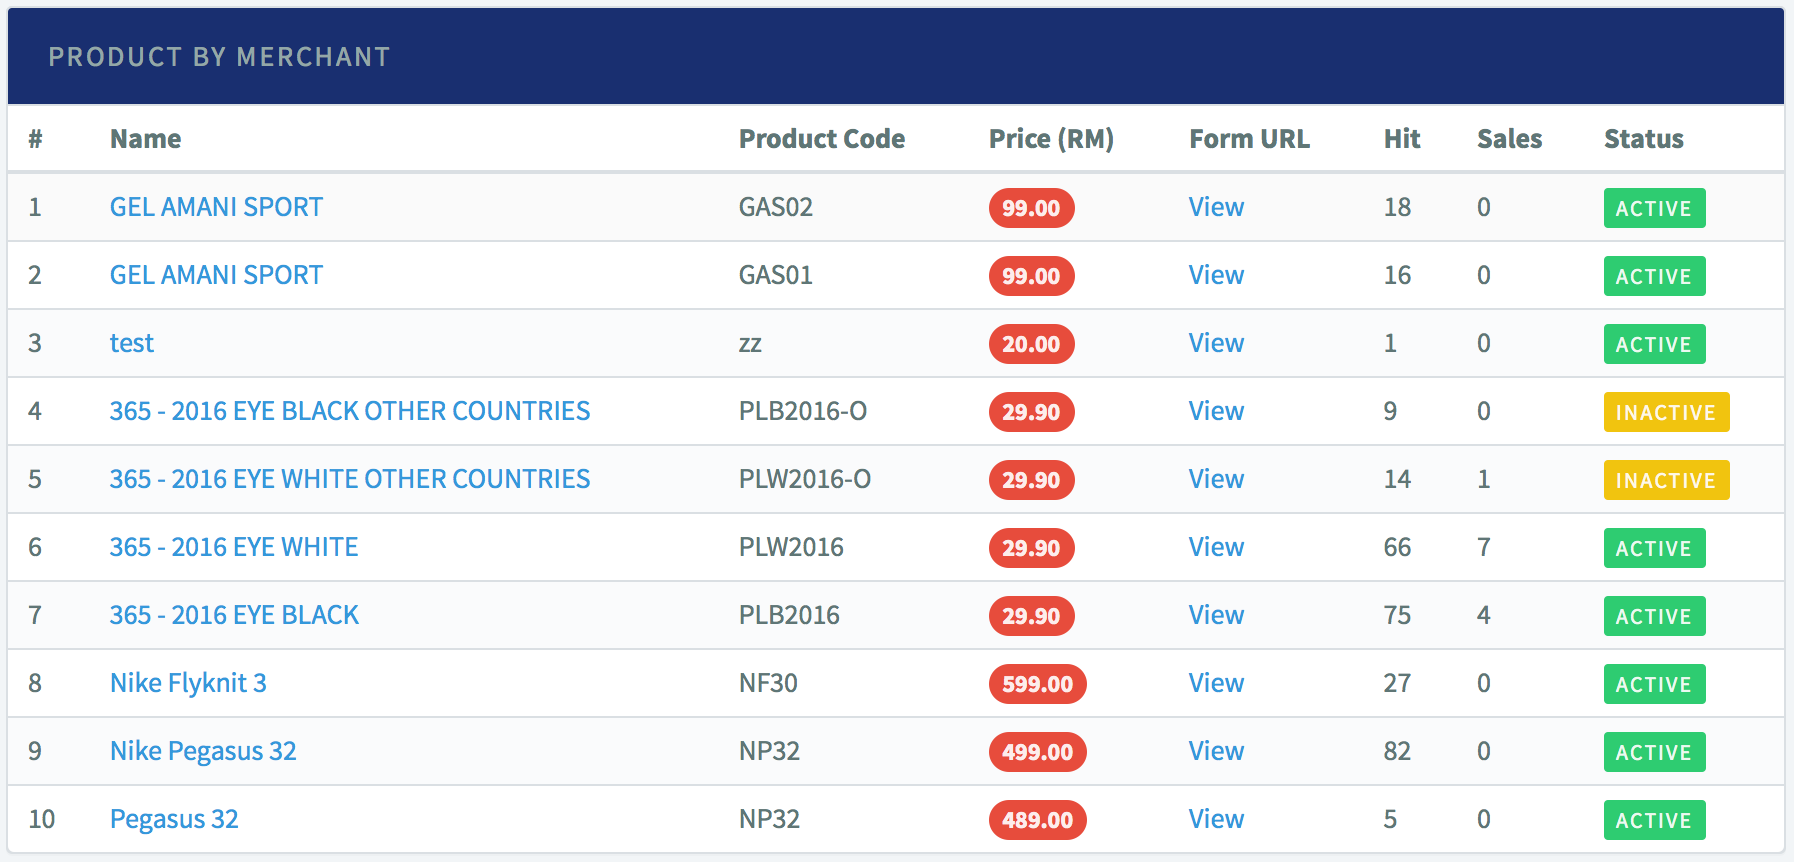
4. On the list, click on the product that you just added / the product that you want to set the Advanced Delivery Costing feature. Click at the product name.

product_01

5. When the product detail page appears, scroll down to the bottom end, and click “Edit Product.”

Screen Shot 2015-06-08 at 5.43.21 PM

6. You are now in editable mode. Scroll down to the Advanced Delivery Costing table, and insert your cost accordingly.

Screen Shot 2016-02-15 at 1.19.27 PM


7. When you have finished, click “Confirm Changes.”

Screen Shot 2015-06-08 at 5.45.09 PM

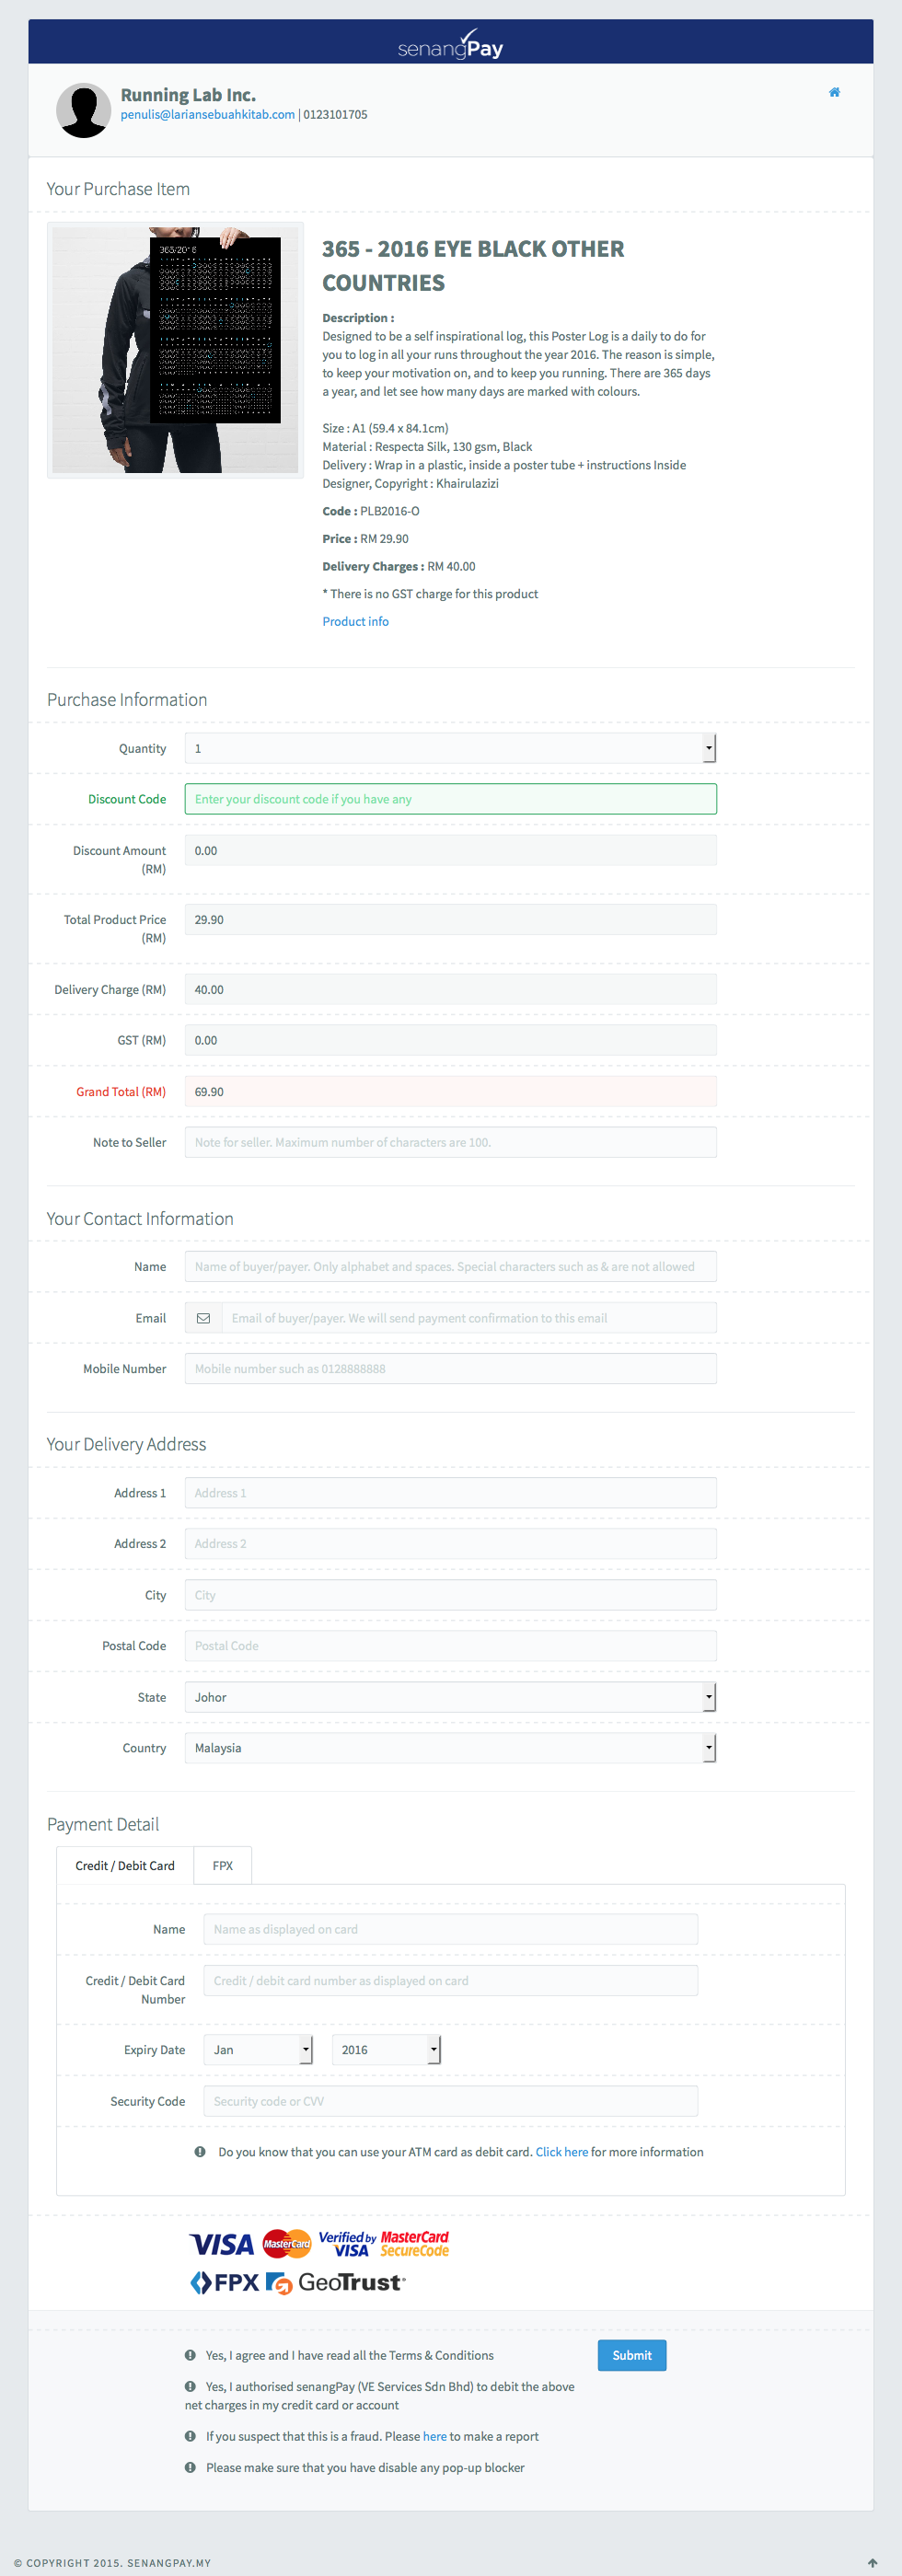
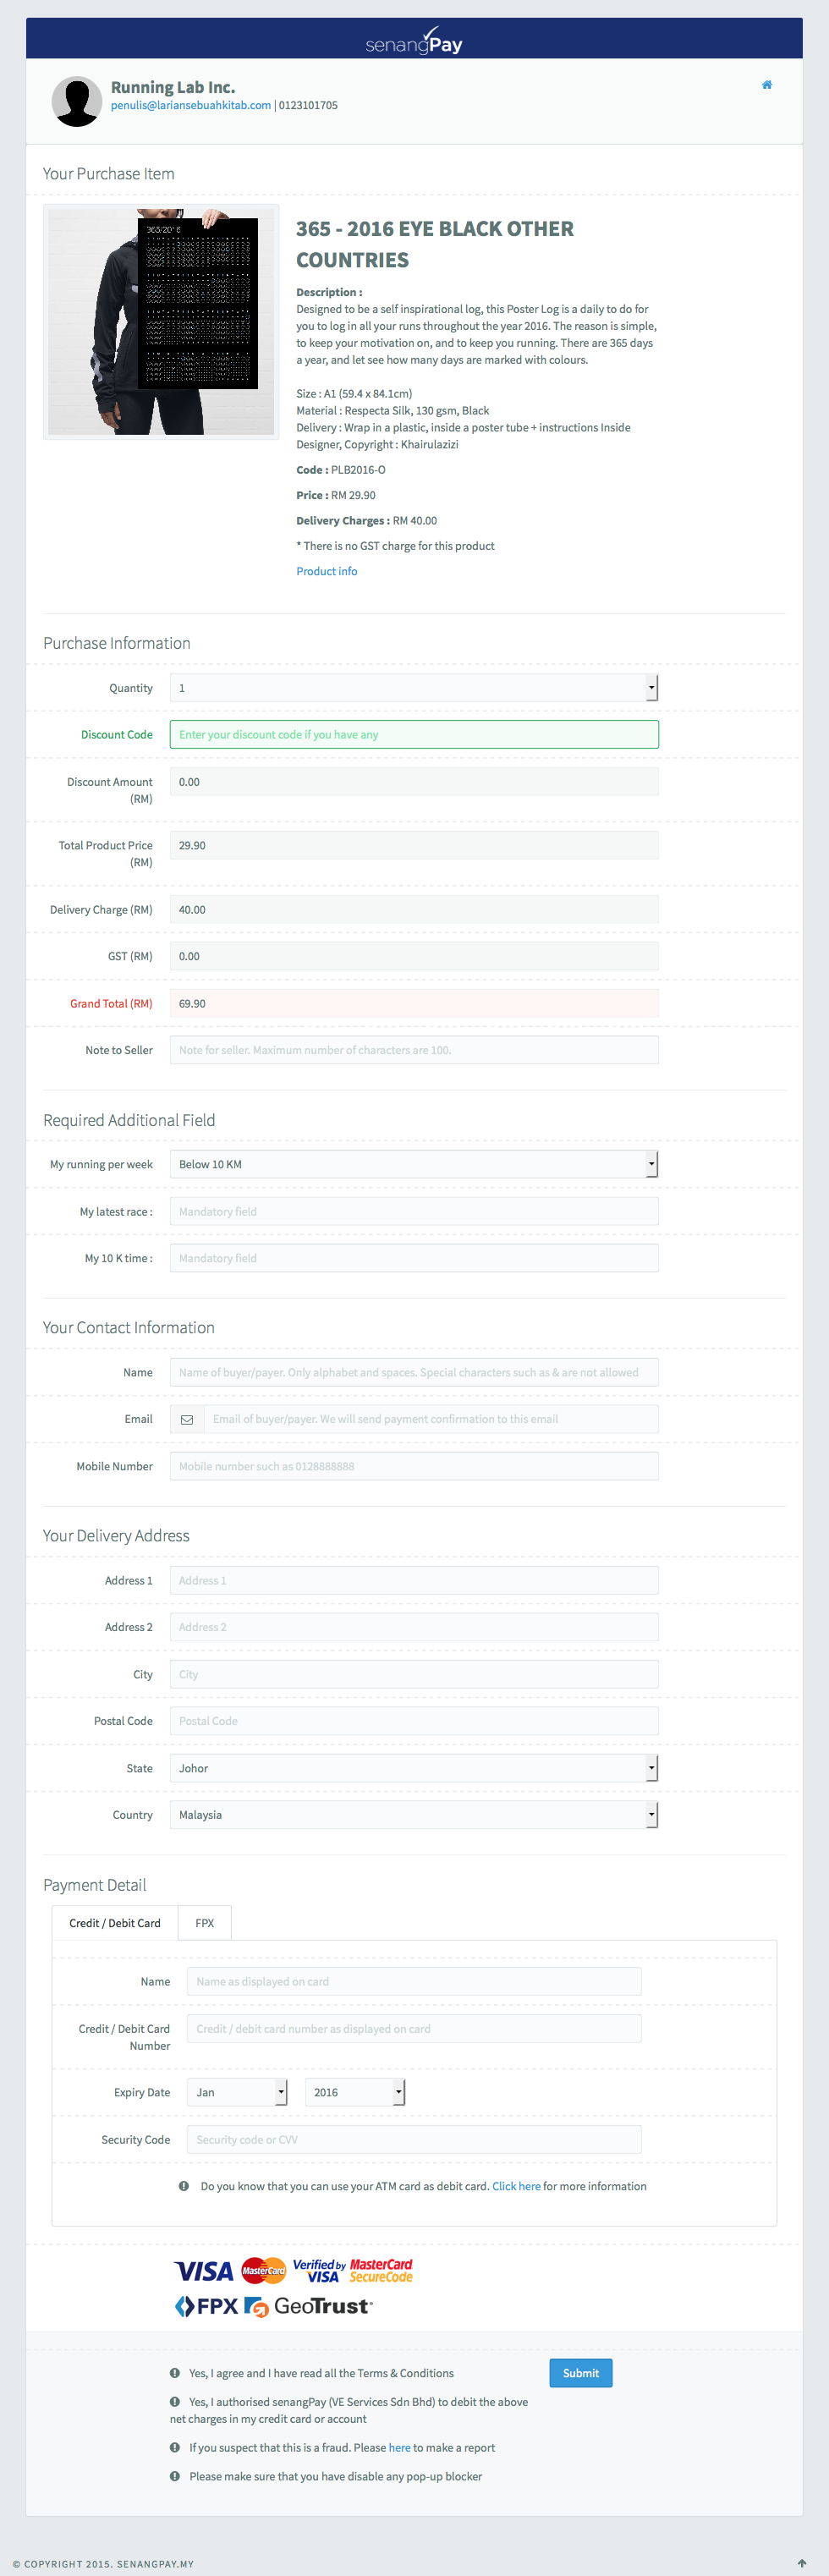
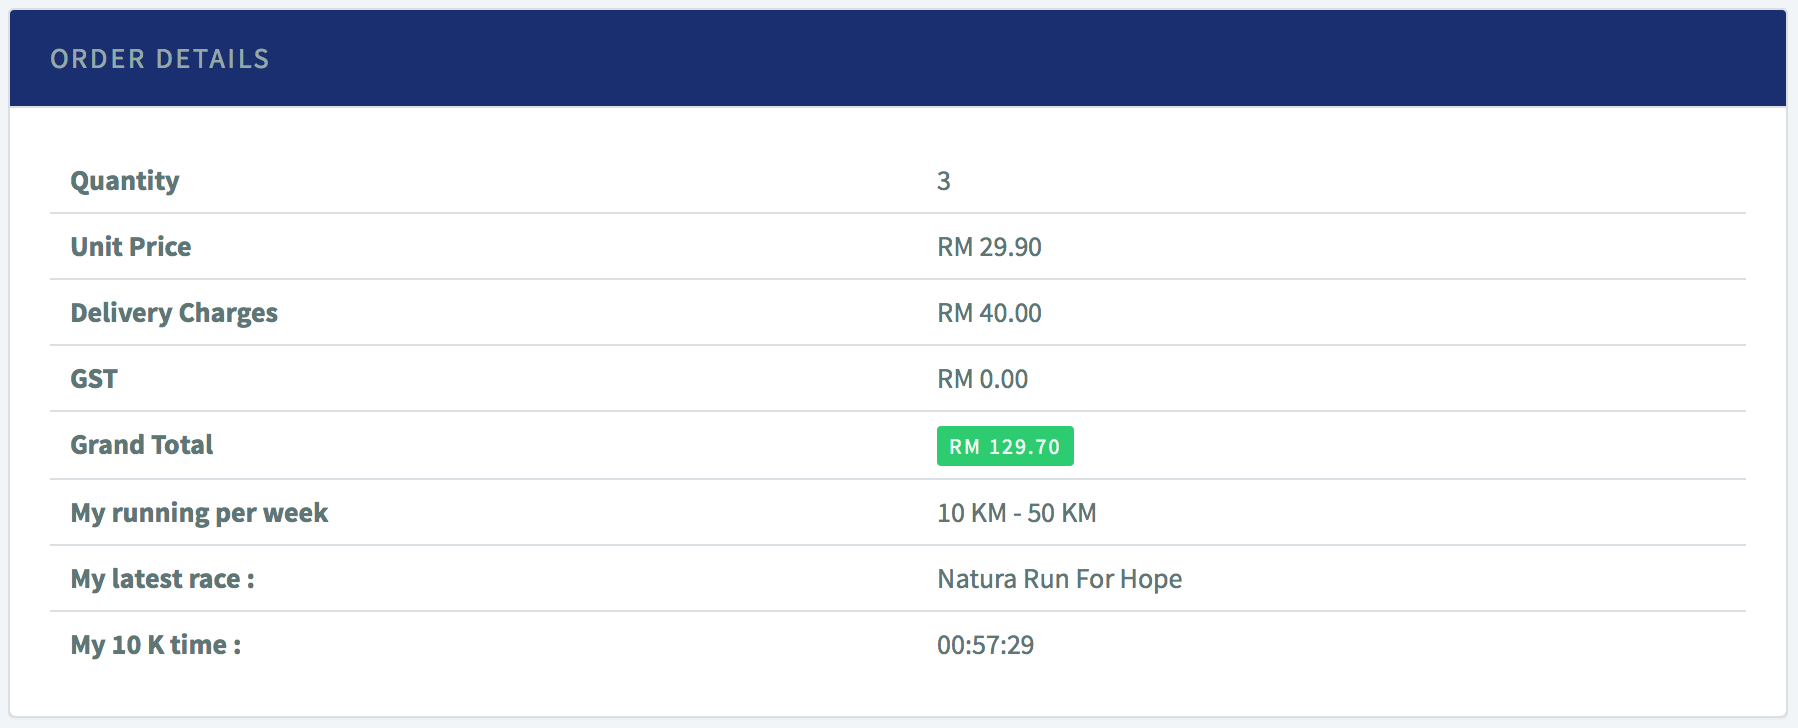
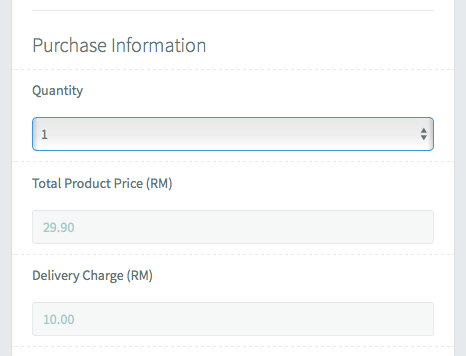
8. Go back to your Unique Payment Form, and check the new delivery pricing. It should reflect the cost that you just updated. Below are some screenshot examples on the updated cost.

Quantity 1 = Delivery RM10.00

Screen Shot 2016-01-11 at 10.54.54 AM

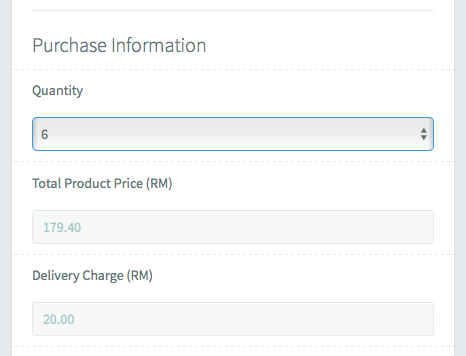
Quantity more than 5 = Delivery RM20.00

2

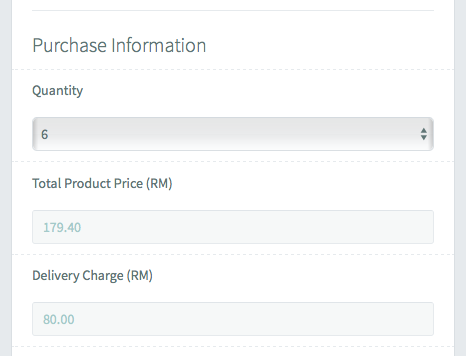
Delivery cost change to RM80.00 when other country is selected.

3
space

Are there other things that I need to know?

You need to make sure that you fill all the 60 boxes of the Peninsular, Sabah, Sarawak, Singapore, Brunei and Others. Otherwise, the costing will not be saved.

Screen Shot 2016-02-15 at 1.23.07 PM

space

What if I don’t deliver items to other countries like Singapore?

You need to make sure that the fields are filled up with numbers. Let’s say you have no delivery to Singapore, then, put 0.00 in the fields.

Screen Shot 2016-02-15 at 1.23.54 PM
space

Why do I need to fill every boxes?

Our apps checks all value in the boxes line by line. This is because we cannot afford to loose any value that merchants insert in the boxes. Some merchants offer free delivery until certain quantity while some merchants start charging delivery according to the number of quantity. Thus, filling all boxes is mandatory for every merchants.
space

This is insane. Why can’t senangPay think a simplified method to solve this?

The ADVANCE DELIVERY COSTING is design to accommodate all kind of merchants. Different merchants sells different items with different delivery cost with different quantity to different country. Thus we need to be fair for all our merchants and only by allowing every merchants to control each delivery cost for each quantity for each country, will solve everybody’s problems.
space

But still, I have 1000 products thus, do I need to deploy everything accordingly?

Yes you need.
space

Do I have any other options?

You can choose to start integrate with shopping carts if you have a lot of products to sells. The Payment Form is designed for merchants that has limited number of items. Using shopping cart will let you manage your product and business more effectively if you have a lot of products to sells. Please take note that senangPay is an Online Payment Gateway at this moment and not yet an Online Business Management Solutions yet. Kindly choose the supported shopping cart by senangPay by clicking here.

Screen Shot 2015-04-09 at 1.17.01 PM

Related Content :

1. Advanced Delivery Costing : Why I cannot save?
Screen Shot 2015-04-09 at 1.17.01 PM
Have more questions? Submit a request by clicking the green help button right side, bottom

What senangPay Gives Me

$
0
0

Universal Payment Form

A Universal Payment Form which allows your buyer to key in the product themselves, together with the price of the product. No fix product and no fix amount.

senangpay_diagram06

This Universal Payment Form is designed for business owner with the following purpose:

a. Has one product with various price (e.g. Insurance)

b. Require a booking fees / downpayment (e.g. Property)

c. For monthly bills (e.g. Telecommunication)

d. To collect donation (e.g. Mosque)

e. For membership subscription (e.g. Society)

This Universal Payment Form is also designed for individual to :

a. Collect money that their friend owes them

b. Ask for money from their parents


137x22xspace.png.pagespeed.ic.IoAxAisfVW

Unique Payment Form (Collection)

A Unique Payment Form allows you as the business owner to add more than one specific product, and let you monitor each product transaction separately.

senangpay_diagram07

This Unique Payment Form (Collection) is designed for business owner who has:

a. Many products with various prices (e.g. Hijab)

b. Tickets (e.g. Event Organizer)

c. Tuition Fees (e.g. Tuition Center)


137x22xspace.png.pagespeed.ic.IoAxAisfVW

Shopping Cart Integration

Integrate with your existing shopping cart if you already have one. Currently we support WooCommerce, OpenCart, Prestshop and Drupal Ubercart. For non-supported shopping cart, we have our OPEN API for you or your developer to integrate.

Click here for more details.

137x22xspace.png.pagespeed.ic.IoAxAisfVW

Ready Online Store + senangPay

If you want to skip the developing phase and integration part, those programming stuff that gives none other than only a headache, you can opt to a ready monthly / yearly subscription online store. Pay and use method. Currently we support EasyStore.

Click here for more details.

137x22xspace.png.pagespeed.ic.IoAxAisfVW


Manual Integration with your self built system

If you want to integrate senangPay with your own system, we have a standard OPEN API for your integration.

Click here for more details.

137x22xspace.png.pagespeed.ic.IoAxAisfVW

Dashboard

An access to the Dashboard where you can monitor your sales, transactions, settlement payments, settings and support tickets. This Dashboard is made responsive even to any mobile phone for you to access on the go.

137x22xspace.png.pagespeed.ic.IoAxAisfVW

monitor2-1

Screen Shot 2015-04-09 at 1.17.01 PM

Related Content :

1. Sign Up / Register with senangPay
2. senangPay Dashboard Feature
3. senangPay Fee & Costing

Screen Shot 2015-04-09 at 1.17.01 PM
Have more questions? Submit a request by clicking the green help button right side, bottom

How to make subscription payment to senangPay

$
0
0

Subscription Payment

When you have agreed to subscribe to any package by senangPay, you will need to make the first payment in order to activate your account. You can directly make payment after you have completed the registration form.

1. Complete the registration form here.

2. Read the terms & conditions at the bottom of the form by clicking “user agreement”.

3. Click “Register” to proceed to payment form.

4. Choose to make payment via credit / debit card or Internet Banking (FPX)

5. Click “Confirm Payment” button.

Below is an example of the payment form that you will need to fill in for the registration. Simply choose to pay either using credit / debit card or Internet Banking (FPX).

senangpay1


6. You will be directed to your Bank to make payment. For example, if you select FPX > Maybank2u, the login page of Maybank will pop up.

maybank2u


7. Login to your Bank and proceed to make payment.

8. Then, you will see a transaction receipt from FPX stated that you have made payment to “VE SERVICES SDN BHD”

receipt_ve

9. You will also received Welcome Email for account activation from senangPay.

10. Now you can login to your dashboard and use senangPay. Don’t forget to upload your related documents via the dashboard within 7 days or your settlement will be pending.

137x22xspace.png.pagespeed.ic.IoAxAisfVW

Download Subscription Tax Invoice

For the newly subscription Tax Invoice, kindly proceed to login to your dashboard.

1. Go to http://app.senangpay.my or simply login from http://senangpay.my page.

2. Insert your login email and password.

3. Click onn the menu Charges > List

screen-shot-2016-10-26-at-6-51-31-pm


4. You will see a page of Charges List from senangPay to you. Since you are newly registered, you will only see one charge list that is the registration charges.

screen-shot-2016-10-26-at-6-53-28-pm


5. Click on the icon under the “Action” column. A pop up of your subscription transaction will appear.

receipt

Screen Shot 2015-04-09 at 1.17.01 PM

Please take note that :
1. The subscription fees is including GST charges.

Screen Shot 2015-04-09 at 1.17.01 PM

Related Content :

1. What documents to submit
2. How to submit documents
3. What happened after I submit my documents?

Screen Shot 2015-04-09 at 1.17.01 PM
Have more questions? Submit a request by clicking the green help button right side, bottom


How to know your registration application has been approved

$
0
0

How to know your registration application has been approved

senangPay is the fastest Online Payment Gateway which automatically pre-approves your application after you make the subscription payment.

1. If you have register and made the payment, you will receive a Welcome Email from senangPay.

2. You should be able to login to the Dashboard after you have received the email.

3. You can download your subscription receipt from your dashboard. Click here for details on how to get your Tax Invoice.

5. If the application failed due to payment rejection or any other causes, our marketing team will call you for the next moves.

6. If you can’t wait, send us a ticket via the green help button on this page or from your dashboard.

7. However, please take note that your account in a pre-approves mode. You need to upload your related documents via the dashboard within 7 days, or your settlement will be pending.

Screen Shot 2015-04-09 at 1.17.01 PM

Please take note :
1. In case of Terms & Conditions breach, your account will be suspended until further notice.

Screen Shot 2015-04-09 at 1.17.01 PM

Related Content :

1. Why I cannot login to my account
2. What documents to submit
3. How to submit documents
4. What happened after I submit my documents?
Screen Shot 2015-04-09 at 1.17.01 PM
Have more questions? Submit a request by clicking the green help button right side, bottom

Login to senangPay

$
0
0

Now, there are 2 ways to login to senangPay Dashboard.

1. Login through senangPay website. Simply click on the “Log Masuk” link on top of the web menu.

Screen Shot 2015-07-20 at 2.44.23 PM

2. Login through the first page of the Dashboard. Simply type the URL https://app.senangpay.my/login

senangpay_front

3. Next, insert your username (registered email) and your password.
4. Click “Login”.

Screen Shot 2015-04-09 at 1.17.01 PM

Please take note :
1. You can save the dashboard page as your bookmark in your web browser, or your smartphone / tablet.

Screen Shot 2015-04-09 at 1.17.01 PM
Have more questions? Submit a request by clicking the green help button right side, bottom

Menu & Submenu senangPay Dashboard

$
0
0

senangPay Dashboard are designed to be as simple and effective as it could be. The dashboard are designed and divided  into three parts.

senangPay_01

1. The Header – The top panel, consist of senangPay logo , Edit Profile and Logout
2. The Menu – The side bar, menu navigation
3. The Content – The right space which will display the content once you hit the menu


Menu

Below are the menu for the Dashboard.

menu_01

1. To reveal submenu, simply click on the menu link.

menu_02

2. Next, to understand each menu, click on every list below.

a. Dashboard
b. Report
c. Product
d. Transaction
e. Payment
f. Charges
g. Settings
h. Support

Screen Shot 2015-04-09 at 1.17.01 PM

Related Content :

1. Login to senangPay 

Screen Shot 2015-04-09 at 1.17.01 PM
Have more questions? Submit a request by clicking the green help button right side, bottom

Sign out senangPay

$
0
0

If you have done doing your senangPay activity for the day and need to log out, simply click the log out button.

1. Go to the top header on your right side.

signout_02

2. You will see your profile avatar.
3. Click at the profile avatar, a drop down menu will appear.

signout

4. Click “Sign Out”

Screen Shot 2015-04-09 at 1.17.01 PM

Please take note that :
The Dashboard will be auto sign out if you left the dashboard idle within 1/2 hours for security reason.Screen Shot 2015-04-09 at 1.17.01 PM
Have more questions? Submit a request by clicking the green help button right side, bottom

Dashboard

$
0
0

Dashboard is a one page summary to display all summary activity that related to your business through our payment gateway. Below are the screenshot of the dashboard.

dashboard

So what will you benefit from here?

1. Total Transaction Today – The number of transaction that happened today

Eg. Say that you have 29 sales today, so the figure displayed will be 29.

senangpay_total_transaction

2. Transaction Amount This Month – The total amount / value of the transaction in current month

Eg. Say you have 290 sales this month, and the sum of the sales value is RM3400, thus the figure displayed will be RM3400.

senangpay_monthly_transaction

3. Transaction Approved This Month – The total transaction that approved this month by bank, means, the sales that happened successfully.

senangpay_approved_transaction

4. Payment Amount Due – Payment balance due from senangPay to merchant (you)

senangpay_payment_due

5. No of Open Feedback – The number of feedback that is currently in discussion between you and senangPay Support team

senangpay_feedback

6. Total Product – The number of product that is currently in your senangPay Dashboard, whether active or not active

senangpay_product

7. Transaction Stats – Display all transaction frequency with senangPay in 12 months

graph02

8. Revenue Stats – Display all revenue value from customer through senangPay in 12 months

graph01

Screen Shot 2015-04-09 at 1.17.01 PM
Have more questions? Submit a request by clicking the green help button right side, bottom

Report

$
0
0

Report allow you to generate and download your activity details from senangPay. Under the Report menu, there are 2 submenu.

menu_03


Transaction

Transaction is a sales record between you and your buyer. This page allow you to generate transaction report. Select your preference filter and then simply click the “Generate Report” button.

report_01


Below are the example report that being uploaded to Google Drive.

Screen Shot 2015-07-20 at 4.02.09 PM


Screen Shot 2015-04-09 at 1.17.01 PM

Please take note that :

1. You can select to generate report on UNIVERSAL PRODUCT, UNIQUE PRODUCT or ALL PRODUCT
2. You can filter to generate report based on the transaction status either PAID, FAILED, PENDING PAYMENT or ALL STATUS
3. You can set to generate report from a time range
4. The report can be opened with Microsoft Excel

Screen Shot 2015-04-09 at 1.17.01 PM

Related Content :

1. Transaction

Screen Shot 2015-04-09 at 1.17.01 PM

Product

$
0
0

Product is the place where you upload all your unique product for sale. Means, you have a lot of product to sell. Use Product if you want to use the Unique Payment Form. Under the Product menu, there are 2 submenu.
menu_04


List

This will displayed all the product that you already add in the apps.

product_01

Below are the details of the elements in the table :

Item Detail
Name The name of the product
Product Code The product code for your own refference
Price The price of your product
Form URL The Unique Payment Form URL which you use to get payment
Hit The number of hit that customer view this product Unique Payment Form
Sales The number of sales of this product
Status The status of this product whether Active or Not Active

Screen Shot 2015-04-09 at 1.17.01 PM

Please take note that :
1. When you click on the product name, you will see the detail page of the product.
2. When you click on the “View” link under the Form URL, you will be directed to the actual Unique Payment Form.


Create New

This is to add new product in the Dashboard. When you add product, it will create a Unique Payment form. Fill in the related fill and click “Create Product” button.

product_02

Below are the details of the elements in the table :

Item Detail
Product Name The name of the product
Product Price The price of your product
Delivery Charge The amount that you charge to deliver your product through courier
Apply GST Select YES if you apply GST in your sales READ HERE
Product Description Write your product description here. Max is 500 charatcters
Product Code The product code for your own refference
Product Image The image of your product
Product Info URL If you have additional write up on your product elsewhere, you can insert the URL here


Delivery Address / Self Pickup

There are also some additional setting that you need to aware in case your have some special arrangement on the delivery of the product.

product_03

1. If you want to display delivery address in your payment form, click the first radio button. Your unique payment form will have address field.
2. If you do not want to display delivery address or self pickup, click the second radio button. Your unique payment form will have no address field.
3. If you want to give option to your customer either to receive time by postal or can choose to self pickup at your office, select the third radio button. You unique payment form will have a drop down menu for customer to select either self pickup or deliver to address. Below are the example screenshot of the payment form.

payment_form01


Size

If your item is related with sizing, you can set to display sizing option that you want to display in your payment product. Simply click on the check box that you want to display. If your preferred selection is not in the list below, simply log your request through the Feedback in the Dashboard.

product_04

Don’t forget to click “Create Product” if you already confirm all the information added regarding your product. This will generate you unique payment form.

Screen Shot 2015-04-09 at 1.17.01 PM

Please take note that :
1. Once you add your product, it will create an Unique Payment Form. Click here to view the example of Unique Payment Form with product name : Poster Kill Bill

Screen Shot 2015-04-09 at 1.17.01 PM

Related Content :
1. How to setup Unique Payment Form

Screen Shot 2015-04-09 at 1.17.01 PM


Transaction

$
0
0

Transaction is the place where you can view all the sales record between you and your buyer. You can view the detail transaction and make search to any transaction. Under the Transaction menu, there are 2 submenu.

menu_05


List

This is to display all sales transaction that your buyer has made through senangPay Payment Gateway

transaction_01

You can filter the transaction accordingly.

transaction_03

Screen Shot 2015-04-09 at 1.17.01 PM

Please take note that
1. The Dashboard will record all transaction including the FAILED transaction for your reference.


Detail Transaction

To view the detail transaction, simply click on the name of your buyer. You will see a detail information of the transaction.

transaction_02

You can view the sales receipt by clicking on the transaction reference. A new window will pop up the transaction receipt.

Screen Shot 2015-07-20 at 4.54.53 PM

( Sales receipt img )


Search

You can search any transaction that has been made by your buyer. Simply key in the details that you want and click “Submit” button.

search_01

A list of transaction will displayed as a result. Click on the buyer’s name to view the details.

Screen Shot 2015-04-09 at 1.17.01 PM

Please take note that
1. You can search the same buyer by inserting the same email address.

Screen Shot 2015-04-09 at 1.17.01 PM

Related Content :
1. Report
2. Why is my client’s payment sometimes FAILED?

Screen Shot 2015-04-09 at 1.17.01 PM

get_merchant_info

$
0
0

Get Merchant Information

This will return a filtered down information for a given merchant.

https://app.senangpay.my/openapi/get_merchant_info


API Consideration

  • Only merchant with Advance Package/Advance Package (Classic) can use this API (subject to a more specific API access rules. Refer to API Access Availability section)


Parameters

Name Type Description
merchant_id string Your account merchant ID. Available from Dashboard > Settings > Profile > Shopping Cart Integration Link.
secret_key string Your account secret key. Available from Dashboard > Settings > Profile > Shopping Cart Integration Link.
merchant_id_verify string The merchant ID for the account your want to check. Available from merchant’s Dashboard > Settings > Profile > Shopping Cart Integration Link.
secret_key_verify string The secret key for the account your want to check. Available from merchant’s Dashboard > Settings > Profile > Shopping Cart Integration Link.


API Access Availability

Your account would need special privilege for this API else you will encountered the following message.

Unauthorized API usage. Please contact senangPay for further details.


Example

curl https://app.senangpay.my/openapi/get_merchant_info \
 -d merchant_id=1111111111 \
 -d secret_key=111-111 \
 -d merchant_id_verify=2222222222 \
 -d secret_key_verify=222-222


Successful Response

{
    "data": {
        "merchant": {
            "name": "Foo Bar",
            "access_email": "foo@bar.com",
            "shop_name": "Foo Bar Enterprise",
            "phone": "0109876543",
            "status": "active",
            "date_registered": "2017-02-14T14:37:14+08:00"
        },
        "package": {
            "name": "Advance Package"
        }
    },
    "http_status_code": 200
}


Failed Response


Unknown API or API is inactive.

API does not exist or the API have been disabled globally.
 

Invalid parameter(s). Please make sure parameter required was set correctly.

Either one of the above parameters are missing or of incorrect type.
 

Unauthorized API usage. Please contact senangPay for further details.

It could be any of below:

  • Merchant is inactive
  • Merchant ID and secret key was incorrectly supplied
  • Merchant is not authorized for this specific API usage


Merchant not exist. Please check if the merchant ID and secret key to be verified is correct.

Either the merchant you are checking does not exist, or you have supplied an incorrect merchant ID and secret key for the merchant you want to check.

Recurring Instalment

$
0
0

Recurring payment are transactions that occur on a repetitious basis, such as a subscription service where payments are charged to the same payment method for a pre-determined duration of time.

How Does Recurring Payment Work?

In a recurring payment, a customer will purchase a product, item or service. Instead of charging one price, the merchant will establish a set interval of time in which the costumer will be charged an agreed-upon sum. This payment will continue until the customer either cancels the service or, if the charge applies to one lump amount is paid off.

Adding Product for Recurring Instalment

Now, here are the steps on how to setup the product for recurring subscription. Basically you must create the Product first. Once the Product in the list, you may proceed on setting up the recurring payment for selected product.

1. Go to “Product” click “Create New.”

CreateProd2

2. You will see 3 sections there. On the top section, insert all related information about your product.

ProdDetails


3. Second section is the “Payment Frequency Setting”. Choose “Recurring Instalment”.

RecInst1

4. Choose the preferred details for recurring subscription payment option. “Payment Frequency” options are Monthly, Yearly, Quarterly and Biannually.

PaymentFreq

5. Next, choose “Repetition” for the product payment.

RIRepetition

6. Next, click on “Do not display address or item is self pickup”.

ProdDisplaySetting_SelectNo

7.  Finally, click “Create Product” when your product is ready to enter the system.

createProduct

8. Your product for recurring subscription is now in the system.Screen Shot 2015-04-09 at 1.17.01 PM
Have more questions? Submit a request by clicking the green help button right side, bottom


Recurring Payment

$
0
0


Item Recurring Instalment Recurring Subscription
(Non Predefined Billing Date)
Recurring Subscription
(Predefined Billing Date)
1) No of predefined payment Yes No No
2) Predefined billing date No No Yes
3) Prorate No No Yes


Below is an example of prorate calculation:

  • Normal billing date duration set by the merchant is between January 15th until February 2nd
  • Then, the charge imposed earlier for example on February 10th

Hence, the calculation will be as follow:

Formula
= RM 100 per month / total days per month x days (tak pasti term apa nak letak untuk hari yang diawalkan)
= RM 100 / 31 days x 5 days
= RM 16.13

Thus, the prorate total amount will be RM 16.13

Screen Shot 2015-04-09 at 1.17.01 PM

makefg-1-php Important
Kindly be informed senangPay recurring payment is not an easy payment.

Screen Shot 2015-04-09 at 1.17.01 PM

Recurring API

$
0
0

If you have your own system and wish to integrate to senangPay for recurring payment you will need to first add your product into senangPay. The product need to be created first in order for auditing purposes.

Below are the details and steps required.

Info required

To start we will need the information as below. These can be retrieve in senangPay Dashboard.

1. Go to Settings > Profile


Settings

2. Refer to Shopping Cart Integration Link section. Get your Merchant ID and Secret Key information.

ShoppingCart

3. Then you will need to fill in the Recurring Return URL. This is the URL where senangPay will redirect the buyer after the payment has been processed.

4. Next, you need to fill the Recurring Callback URL. Recurring Callback URL is used as alternative notification to merchant shopping cart in case there is a breakdown in transaction flow. For more info on Callback URL, read here

CallbackURL

Get the Recurring ID

Recurring id is the unique id to identify your recurring product. To obtain the recurring id, you must first create a recurring product in senangPay dashboard.

1. Go to Product > Create New

GetRecID

2. Create a recurring product. You can learn more on how to create a recurring product here at these links.

a. Instalment Product
b. Subscription Product

3. Once the recurring product has been created, view the product details page, scroll down to Payment Frequency Setting section. The Recurring Id is located under Recurring Type.

RecType

What parameters to send to senangPay

Below are the details of the elements in the table:


Item Detail
order_id This is the id to be use to identify the shopping cart when senangPay redirect back the buyer after the payment was made. The maximum length is 100 characters. Example 3432D4. Only A to Z, a to z, 1 to 0 and dash allowed.
recurring_id This is the id to be use to identify the which recurring product/item senangPay need to process.
hash This is the data to ensure the data integrity passed from merchant’s shopping cart to senangPay. Refer to How to generate the secure hash section for more info.
name This is the name to populate in the payment form so that customer do not have to key in their name. This is optional and not have to be part of the hash. Customer is able to overwrite the value in payment form.
email This is the email to populate in the payment form so that customer do not have to key in their email. This is optional and not have to be part of the hash. Customer is able to overwrite the value in payment form.
phone This is the phone to populate in the payment form so that customer do not have to key in their phone. This is optional and not have to be part of the hash. Customer is able to overwrite the value in payment form.

How to send the parameters to senangPay

1. The parameters can be send either using GET or POST method.

2. The URL is https://api.senangpay.my/payment/ followed by your merchant ID.

3. Example https://api.senangpay.my/payment/14222653788472

What Parameters does the shopping cart received from senangPay

Below are the details of the elements in the table:


Item Detail
status_id This is to indicate the status of the payment. It only has 2 values which is 1 for successful and 0 for failed.
order_id This is the order that was sent to senangPay. This is to identify the transaction generated from your application.
msg This is the message to describe the payment status. The maximum length is 100 characters. Take note that the message may contain underscore. You can replace the underscore as space when displaying the message to your customer. Example Payment_was_successful.
transaction_id This is the transaction ID used by senangPay. You can use this ID to track the transaction in senangPay. The maximum length is 100 characters. Example 14363538840
hash This is the data to ensure the data integrity passed from senangPay to the merchant’s shopping cart. Refer to section How to verify if the secure hash is correct for more info.

How senangPay send the parameters to merchant’s shopping cart

1. The parameters will be send using GET method.

2. The parameters are sent to URL as configured in the Recurring Return URL. Refer to Info required section.

How to generate the secure hash

1. The secure hash is generated by using sha256 on a string consisting of (according to sequence):

– Secret Key

– Recurring ID

– Order ID

2. For example if the values for the parameters are as below:


Item Detail
Secret Key 53-784
Recurring ID 155243673654
Order ID 56

3. So the string to be hash is 53-78415524367365420.5056 which will generate hash value as 9b36050f74fa855489fdea4f5809fd956147b6dbfb62c4636c46f73c76fa12e8

How to verify if the secure hash is correct

1. Merchant will need to generate the secure hash and compare the secure hash that was received from senangPay.

2. For example if the parameters received from senangPay are as below:


Item Detail
status_id 1
order_id 56
transaction_id 14363538840
msg Payment_was_successful

3. So the string to be hash is 53-78415614363538840Payment_was_successful which will generate hash value as 0ebfcaab4be7463a67d605aad312a03cd6b41df4e3560c2a192b84baab15d127

4. Now you need to compare the hash value that you have generated with the hash value sent from senangPay. If the value does not match then the data may have been tampered.

Download sample code

For your refference, please refer to this sample code. Kindly please download from here.

Download Now

Screen Shot 2015-04-09 at 1.17.01 PM

Related Content :

1. Callback URL
2. Return URL Parameters
3. Merchant ID & Secret Key

Screen Shot 2015-04-09 at 1.17.01 PM
Have more questions? Submit a request by clicking the green help button right side, bottom

Viewing all 123 articles
Browse latest View live